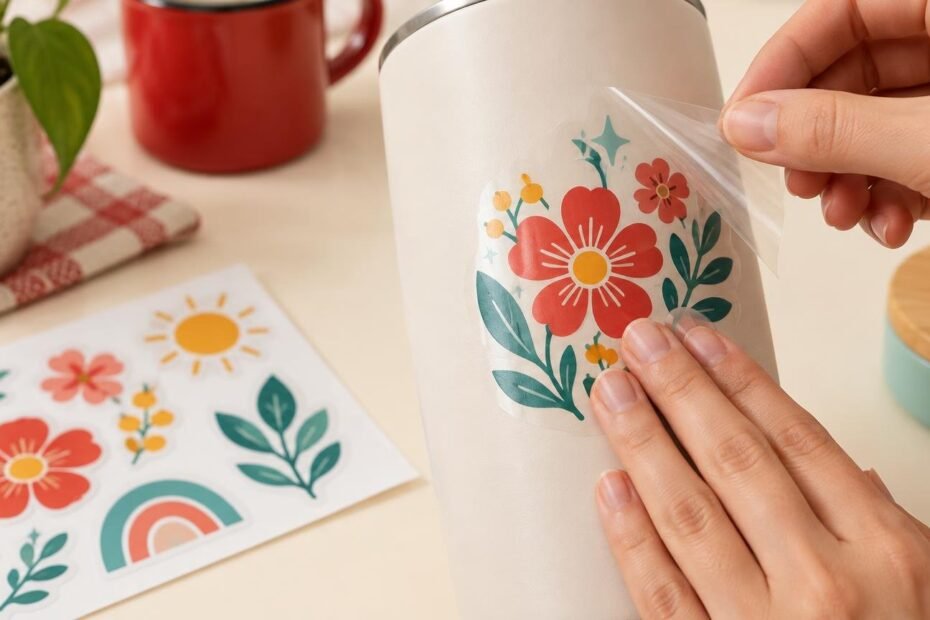
A UV DTF transfer is applied to an object with pressure, not pressed onto fabric with heat. The basic sequence is simple: prepare the object, remove the release backing, place the exposed graphic, press every part of it firmly, and peel away the clear carrier. The fiddly part is controlling those layers so that fine lines, letters and separated details move together.
Before starting, check the instructions supplied with your particular transfer. Film construction, compatible surfaces and aftercare can vary between media systems. General technique will help, but it cannot establish whether one specific transfer is suitable for your powder-coated tumbler, textured case or unfinished wooden box.
First, make sure UV DTF is the right format
UV DTF transfers are commonly used to decorate hard or rigid goods. Technology-level guidance includes glass, plastic, metal, acrylic, wood and ceramics among the broad application categories. That list is not a promise that every coating, texture or object within those categories will accept every transfer. Roland’s overview of UV DTF systems provides useful background on the technology and its hard-goods applications.
Smooth, clean surfaces generally present the most straightforward application. Treat unfamiliar finishes, deep texture, tight curves, flexible materials and rubbery surfaces as test cases. Even two objects described as “plastic” may have different textures, coatings or surface treatments. Test a spare transfer on the actual item when compatibility is uncertain rather than relying on the material name alone.
UV DTF is also different from textile DTF. Conventional textile DTF involves a printed film, adhesive powder, curing or baking, and heat-press application to fabric. UV DTF graphics for hard objects are transferred manually with pressure before the carrier film is removed. Do not apply heat merely because the product name contains “DTF”; use heat only when the instructions for that exact product call for it. Epson’s explanation of textile DTF printing helps illustrate the difference.
Prepare the object before exposing the adhesive
The application area should be clean and completely dry. Dust, debris and fingerprints can sit between the adhesive and the object, creating weak spots or visible defects. Clean the intended area using a method that is safe for the object’s material and finish, then avoid touching it again. The transfer’s own instructions should take priority if they specify a cleaning method.
Set the object on a stable surface and decide on the position before removing the backing. Check alignment against visible features such as a lid, handle, seam or panel edge. Once exposed adhesive touches the object, repositioning may damage fine details or reduce adhesion.
For more general preparation and pressure technique, our guide to applying graphics without trapped bubbles is useful supplementary reading. UV DTF has its own carrier-film sequence, however, so ordinary sticker instructions should not replace the directions supplied with the transfer.
How to apply a UV DTF transfer
- Inspect the transfer before peeling. Identify the release backing, the printed design and the clear carrier film. Check that small letters, dots and isolated design elements appear attached to the carrier.
- Remove the release backing carefully. Watch the exposed graphic as the backing separates. If a small element is not staying with the carrier, pause rather than pulling through it.
- Position the transfer over the prepared area. Keep the adhesive from touching fingers, clothing or nearby debris. Lower it only when you are satisfied with the placement.
- Apply firm, even pressure across the entire graphic. Work over solid areas, edges, letters and small separated details instead of pressing only around the perimeter.
- Peel the clear carrier slowly and at a shallow angle. Watch the edge of the design as it is revealed rather than removing the film in one quick pull.
- If part of the graphic lifts with the carrier, stop. Lay the carrier back down, press that area again and retry the slow peel.
Fine details need extra attention
A single solid shape is easier to monitor than a design made from individual letters, stars or thin lines. Every separated element has to survive two transitions: it must remain with the carrier when the backing comes away, then remain on the object when the carrier is peeled. That is why gradual peeling and frequent visual checks matter. This follows from the staged transfer process rather than from a StickerMart-specific construction specification.
Avoid universal aftercare assumptions
Do not assume every UV DTF transfer is dishwasher-safe, microwave-safe, weatherproof or suitable for food-contact areas. Published care guidance differs among suppliers and media systems. One technical guide advises against dishwasher use, while another manufacturer discusses dishwasher testing for certain glass substrates within its own system. Neither statement establishes the performance of a different supplier’s transfer. LexJet’s UV DTF printing guide documents one such workflow and its care guidance.
The same caution applies to waiting periods. There is no universal curing interval, application temperature or heat-assistance rule established for all UV DTF products. Follow the instructions packaged with your transfer before washing, exposing or heavily handling the finished object.
Know when a conventional sticker is the better choice
UV DTF makes sense when you want an individual raised graphic transferred onto a suitable hard object without a surrounding sticker shape. A conventional sticker or label may be simpler when you need easy batch application, a defined border or a removable graphic. If that is a better match for the project, CustomStickers offers custom stickers, labels and related printed formats to compare.
The practical takeaway
Successful UV DTF application depends less on speed than on control. Confirm that the actual surface is suitable, clean and dry it, plan the alignment, protect the exposed adhesive, press the whole design and peel the carrier slowly while watching every detail. If the transfer or object comes with product-specific instructions, use those instructions for compatibility and aftercare rather than filling in the gaps with rules from textile DTF or another supplier’s media system.
Frequently Asked Questions
Can you apply a UV DTF transfer to fabric?
UV DTF is intended for suitable hard objects and is applied with pressure. Textile DTF uses adhesive powder, curing or baking, and heat-press application to fabric. Treat them as different processes.
Which surfaces work with UV DTF transfers?
Broad application categories include glass, plastic, metal, acrylic, wood and ceramics, but that does not make every coating, texture or object compatible. Test the actual item when the finish or material is uncertain.
Do UV DTF transfers need heat?
Not as a universal rule. Customer application generally uses pressure and carrier-film removal, but you should follow the instructions for your exact transfer rather than borrowing heat settings from textile DTF.
What should you do if part of the design lifts during peeling?
Stop, lower the carrier back over the lifting section, apply firm pressure to that area and retry with a slow, shallow peel.
Are UV DTF transfers dishwasher-safe?
Do not assume so. Care guidance varies by supplier and media system, and the available evidence does not establish dishwasher performance for every UV DTF transfer. Follow the instructions supplied with your product.